QuickTime VR or QuickTime "Virtual Reality" is Apple's exciting new technology that simulates 3D environments. Presenter 3D's Digital SoundStage environment provides you with the virtual stage, lighting, sound recording, and virtual QTVR cameras for the creation of a QTVR object scene. No photographic equipment or any other programs or utilities are required.
When designing a scene, it's important to keep in mind that the viewer is seeing a full 360 degree view of the room. Therefore, when you set up an object scene, you need to place a camera exactly where you want the viewer positioned in the scene. On the Digital SoundStage, the virtual QTVR cameras can be dragged to a position on the viewing stage or placed exactly using numerical input. The software supports the selection of a vertical field of view, and a choice of the three standard QTVR image sizes, or custom sizes. Creating a QTVR node requires the simple action of selecting the rendering options and starting the render. The software handles raytracing a cylindrical view, rotating and dicing the image, and encoding the QTVR parameters. No additional steps or utilities are required.
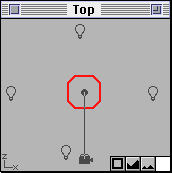
Creating QTVR object scenes is no more complex than creating panorama movies. The major difference is that you position the camera so the object appears in the Digital SoundStage Control Room Window in the size you want it to. You do this by placing the camera pointer in the center of the object in the Top stage view as shown in Fig. 1 and positioning the camera to give you the size image you want.
The following section describes the parameters used in adjusting the field of the object movie. To create a 360 degree view, you can use the default parameters or define a new one using the QuickTime VR Objects parameters shown in Fig. 2.
Under the "Edit" menu, select "QTVR Settings". This brings up the QTVR settings dialog shown in Fig. 2. Here you define object view to be rendered.
H Min and H Max are used to determine the horizontal range. As a general rule, you want HMin to be -180 degrees and HMax to be 180 degrees. That way the user can turn the object a total of 360 degrees, or completely around. If you were rendering an object that didn't have a "back side", like perhaps a fresco or something similar, you could use -90 and 90 degrees, and then the user could only see the front of the object.
 |
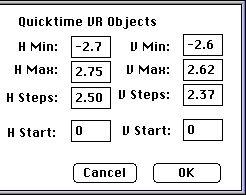 |
| Fig. 1-Top stage view | Fig. 2-QTVR settings dialog |
V Min and V Max are used to determine the horizontal range. To see the top of the object, set VMin to be -90 degrees and VMax to be 90 degrees. Otherwise, limit these to be the maximum amount of tilt you want in that direction. For instance, if you want the user to be able to see the top of the object, but not the bottom, you might want to set the V Max to 90 so the user can see the top, but set the VMin to -30 so that they could only tilt the object so far. If your VMin or VMax range go all the way to 90 degrees, make sure that your camera isn't tilted in the starting position, or you will get strange results when the camera tilts past 90 degrees.
H Steps and V Steps are used to determine how many steps to take in each direction . A setting of 36 H Steps will generate a picture every 10 degrees out of 360. Because of the way that the stepping works, you will probably want H Steps to be an even number and VSteps to be an odd number.
H Start and V Start are used to specify the initial view. A setting of 0 and 0 will specify the starting camera position visible in the camera window. Setting these numbers to some other value will set the initial view to that value. This is most useful if you have an object that goes 360 degrees around, and the full range up and down. In order for the object to render correctly, you should set the camera so that it is completely horizontal. The best view of your object might be looking down at it a bit though, so you can do that by setting V Start to be some positive value.
Now you have to tell Presenter how you want the scene rendered.
 |
| Fig. 3-Render control palette |
Click on the camera type pull-down and select "Object", Fig. 3. This calls up the "QTVR Object camera type." You can use any renderer to produce QTVR object movies. The phong renderer is often a good choice because its very quick and QTVR objects require a lot of frames.
Now you proceed to render as before and Presenter 3D will generate a frame for each horizontal step between H Min and HMax, and each vertical step between VMin and VMax to produce a finished QTVR object movie. Unlike panoramas, QTVR object movies will display at whatever your frame resolution is set to. Use Apple's QuickTime VR player to see the 3D scene you generated.
"I have found VIDI Presenter 3D to be invaluable in creating QuickTime VR scenes.", says Jeff Knapp of J. K. Computer Arts. " VIDI is the only 3D animation software company to provide users with the ability to produce panorama and object movies directly from its 3D application. No other package offers this level of integration and ease of use. With Presenter's automated QTVR generating tools, the whole process of generating a QTVR panorama or object movie has been simplified to one step. It's nice and fast too."