The use of 3D in character animation is growing. The movie Toy Story and the TV program Reboot are prime examples. One of the most difficult things to do in character animation is syncing the lips and other facial features to the words spoken. The way it's done in 2D animation is to record the actor as he's speaking and then do a timing diagram. From this, the animator draws the mouth so that it corresponds as closely as possible to the actual dialogue. As time consuming and difficult as it is for 2D, doing this in 3D is even more difficult. Even with all the powerful equipment and software he had at his disposal, John Lasseter, the Toy Story director, found this to be a difficult task.
Presenter 3D not only makes it doable on the Macintosh, it makes it easy. It's Digital SoundStage animation and sound capabilities offers a powerful, new 3D morphing technology, Multi-Target Morphing. This morphing capability works with the 3D Digital Clay(tm) sculpting and Directional 3D Sound(tm) capability to provide powerful facial animation, muscle flexing, character reshaping, and lip motion synced to sound. The key to facial animation and lip syncing is the ability to create almost unlimited freeform morph shapes with Multi-Target Morphing, while using only a few targets in a variety of combinations. To create facial expressions with other packages, the only alternative is to sculpt hundreds or thousands of key poses individually. With Presenter 3D, it's just a case of blending a few targets.
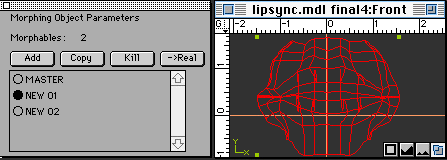 |
Fig. 1-Mouth Wide Target | 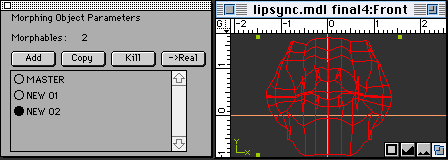 |
Fig. 2-Mouth Open Target |
With the lips modeled and two targets sculpted in Presenter 3D's ModelPro module, open the model in the Presenter module. Here you will generate the morphed lip movement synced to the audio.
 |
 |
| Fig. 3-Attributes Dialog | Fig. 4-Lips Object Attributes Box |
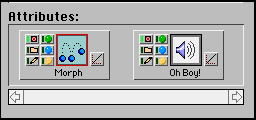
Double-click on the Lips object in the Script window. This brings up the Lips object dialog box. Select Attributes under the Windows menu to bring up the Attributes dialog, as shown in Fig. 3. Click and hold on the Attributes type pulldown. You'll see the four types of external attributes that Presenter 3D supports. These include the motion animators, Pixar's RenderMan shaders, PICT images and QuickTime movies, and sound effects. Select Animators to display all the available motion effects plug-ins.
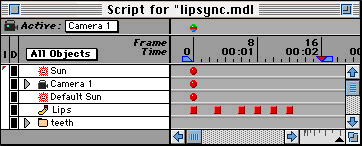
Drag the Morph icon into the Attributes area of the Lips dialog, Fig. 4. Click in the close box to close the dialog. There now appears a red, square box in the first frame of the timeline next to the Lips object indicating that an external attribute has been assigned, as shown in Fig 5.
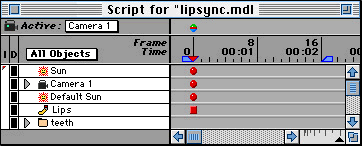 |
| Fig. 5-Lips Script |
Click on the red square to select it. Select Copy under the Edit Menu. Paste five times and position them to cover a time span of two seconds, as shown in Fig. 6.
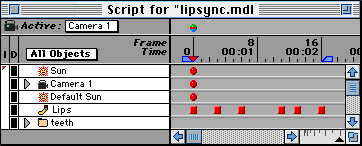 |
| Fig. 6-Lips Script |
Select Attributes under the Windows menu and select the Sound attributes option to display all the available sound files. Double-click on the Lips object in the Script window to bring up the Lips object dialog. Select the "Oh Boy!" sound icon from the Sound Attributes dialog and drag it next to the Morph icon in the Attributes area, as shown in Fig. 7.
 |
| Fig. 7-Lips Object Attributes Box |
 |
| Fig. 8-Lip Position at Frame 1 |
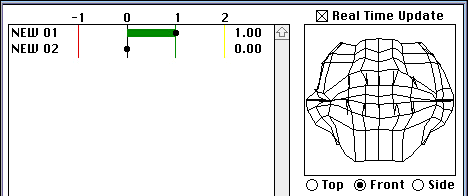
Double-click on the next red square event in the timeline to display the Lips object dialog for frame 3. Double-click on the Morph icon to bring up the Morph target blending dialog. In this frame, we will open the mouth for the "Oh" sound. To open the mouth, move the control bar for the NEW 02 target to the 100% position, Fig. 9. Make sure that the Real Time Update box at the top-right of the dialog is checked. This provides a realtime playback of the morph as you move the control bar.
 |
| Fig. 9-Lip Position at Frame 3 |
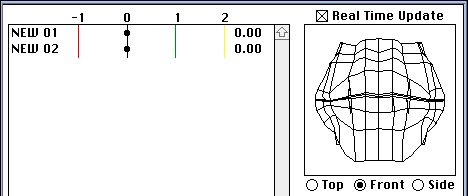
Double-click on the third red square in the timeline to display the object dialog for frame 6 and double-click on the Morph icon to bring up the Morph dialog. In this frame, we will close the mouth, so move the control bar for the NEW 02 target back to the 0% position, as shown in Fig. 10.
| |
| Fig. 10-Lip Position at Frame 6 |
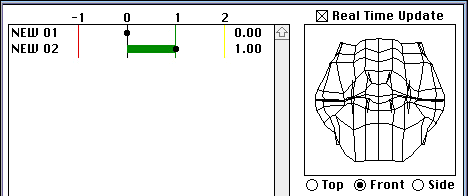
Double-click on the next red square in the timeline to display the object dialog for frame 11 and double-click on the Morph icon to bring up the Morph dialog. In this frame, we will open the mouth for the first part of the "Boy" sound, so move the control bar for the NEW 02 target to the 100% position, as shown in Fig. 11.
| |
| Fig. 11-Lip Position at Frame 11 |
Double-click on the next red square in the timeline to display the object dialog for frame 13 and double-click on the Morph icon to bring up the Morph dialog. In this frame, we close and widen the mouth for the last part of the "Boy" sound by moving the control bar for the NEW 01 target to the 100% position, as in Fig. 12.
 |
| Fig. 12-Lip Position at Frame 13 |
For frame 16, the mouth will be in the closed position. Since this set of targets was duplicated from the first set of targets, no change needs to be made to the targets, since they both are already in the 0% position.
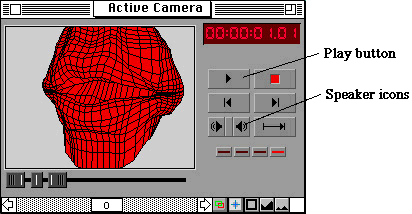
With all the lip motions defined, we'll fine tune the lip motion to the sound. First assign the sound to the sound track. To do this, select Mix Sound Tracks under the Action Menu. Click on the two speaker icons in the Control Room Window to turn them on, Fig. 13. Then click on the Play button to start the animation with sound.
 |
| Fig. 13-Control Room Window |
You will notice that the sound starts before the mouth moves at frame 3 and ends at frame 12 before the mouth stops. In Presenter 3D, adjusting the timing of the lip movement is simple. To adjust the start, double-click on the red square event marker on the Lips timeline and drag the "Oh Boy!" sound icon out of the Attributes box to remove it. Double-click on the second red square event marker, select the Sound Attributes under the Window Menu, and drag the "Oh Boy!" sound icon to the Attributes box. This results in the sound starting at frame 3.
To make the mouth stop in sync with the end of the sound, click-drag the second through sixth red square event markers to the left so that the last event marker is at frame 12 on the timeline. Now you can do additional animation preview tests and adjust the remaining event markers till the final positions looks like those in Fig. 14.
Any time you change the location of where the sound is applied or you change a sound characteristic, you need to make sure that you select Mix Sound Tracks under the Action Menu before you do the animation preview. This replaces the previously generated sound track with a new sound track that corresponds to the new sound changes.
 |
| Fig. 14-Lips Script |
This completes the lip syncing procedure, Click on the motion camera, and the animation will include both the lip motion and the sounds. When you play the animation, you'll see and hear the effects of the 3D lip sync. The primary positions of the lips are shown in Fig. 15
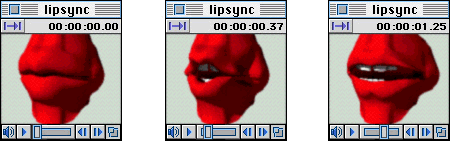 |
| Fig. 15-Sample frames from the animation |
You've seen Milli Vanilli and many other singers doing it live and you've see it in cartoons and films like Toy Story, now you can do it yourself with Presenter 3D. With the ability to exactly shape and move the mouth, you can now use Presenter 3D's Directional 3D Sound capabilities to have characters speak with realistic mouth movement synced to the words.