
Available for download:
As a Word document
ExplodTk.sea.hqx
Grasshopper model
hopper.sea.hqx
Simulating explosions is a popular effect used in the production of multimedia, game, film and video special effect sequences. Presenter 3D provides an open plug-in structure in which custom-designed plug-ins produce motion effects such as a person walking, the effects of the wind blowing, and the flocking of birds. These motion effects can be produced simply by applying the appropriate motion-effect plug-in to an object in your scene. Using Presenter 3D's Shatter plug-in, you can now create a variety of explosion effects directly on the Digital SoundStage(tm).
ASSIGNING THE SHATTER ATTRIBUTE
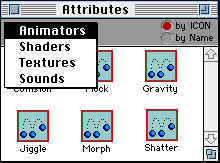
Using model of a grasshopper, we'll demonstrate how to produce the effect of an explosion. Select the grasshopper model in Presenter (access its Cell Info dialog box), select Attributes under the Windows menu. This brings up the Attributes dialog, as shown in Fig. 1. Click and hold on the Attributes type pull-down menu. You'll see the four types of external attributes that Presenter 3D supports: motion Animators, RenderMan shaders, PICT images and QuickTime movies, and sound effects. Select Animators to display all the available motion-effects plug-ins.
 |
 |
| Fig. 1-Attributes dialog |
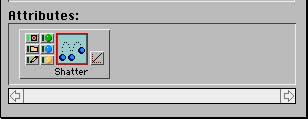
Fig. 2-Grasshopper object attributes box |
Drag the Shatter icon to the grasshopper's Attributes bin shown in Fig. 2.
SETTING THE EXPLOSION PARAMETERS
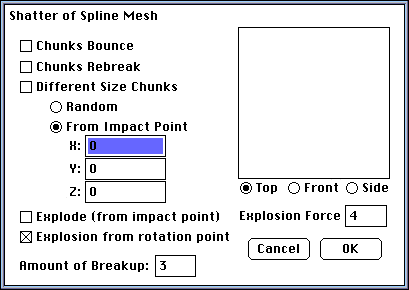
Double-click on the Shatter icon to bring up its control dialog, as shown in Fig. 3. Here you have the option of specifying the starting point of the explosion, the force of the explosion and the relative magnitude of the pieces created by the explosion.
For this example, we'll leave the force at center of the object and the magnitude at four, and change the size from 3 to 1. While the pieces will vary in size, this value will be used to produce larger pieces in general, than if the larger value was used. Click OK to close the dialog box.
 |
| Fig. 3-Shatter dialog box |
Shatter will work on either spline-mesh, morph or polygonal-mesh models, but not on polygonal or 3D primitive objects which can easily be converted to spline-mesh form. It may also be assigned to the main folder to explode the entire object as was done with the grasshopper; or it can be assigned to different parts of an object and at different times using the Script timeline to set explosions in a sequence.
START THE EXPLOSION
Select the render parameters shown in the render palette in Fig. 4 and click on the motion camera to start the animation. Using these settings, Presenter 3D will produce a ray traced, anti-aliased image, with shadows for each animation frame.
 |
| Fig. 4-Render palette |
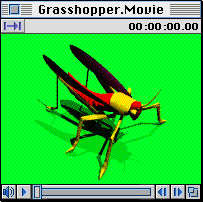
As the animation progresses, you will observe that in each succeeding frame, the pieces are flying farther apart and getting smaller. When the animation is complete, the animation image window will appear. In it you will see the full grasshopper, as shown in Fig. 5. Click on the lower-left button to start the animation.
 |
 |
| Fig. 5-Fig. 5-Initial explosion frame |
Fig. 6-Explosion frame 20 |
The grasshopper image will start disintegrating and in about 20 frames, it will look like the image in Fig. 6.
ADDING DIRECTIONAL 3D SOUND
To make the effect even more dramatic, select a sound icon from the Sound Attributes dialog and drag it next to the Shatter icon, as shown in Fig. 7. Click on the motion camera, and the animation will include both the explosion and sound effects. When you play the animation, you'll both see and hear the effects of the explosion. Try combining more than one sound or record your own.
 |
| Fig. 7-Grasshopper Object Dialog |
The result is a truly awesome effect. This example effectively demonstrates how, in a single application and in a single step, you are able to produce both the visual and the audio effect of an explosion.